|
Home
| Gallery
| About
| Awards
| History of Trophy Fish Carving
| Yesteryear
| Worldwide
| World Championships | Blog | Contact |
|
Home
| Gallery
| About
| Awards
| History of Trophy Fish Carving
| Yesteryear
| Worldwide
| World Championships | Blog | Contact |
|
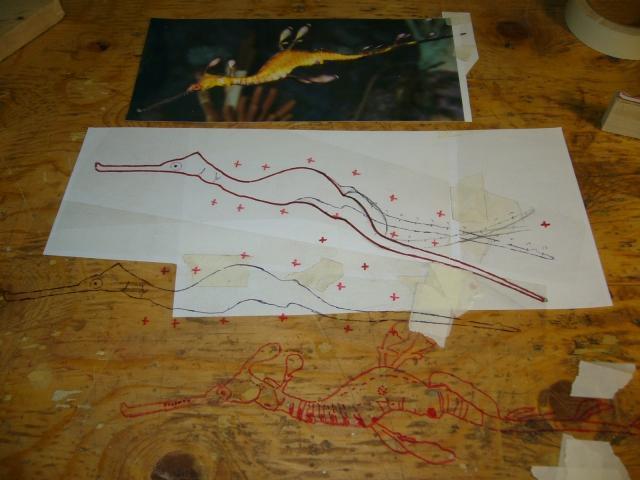
This is how I started the project.
I viewed many Weedy Seadragon photos on Google, and picked one that had about the right pose I wanted and had a good side view.
I enlarged the image on my computer to the size I wanted. Using clear acetate sheet taped to screen, I traced the fish with a permanent felt marker.
Then I scanned the tracing and printed. Then moved tracing on scanner and printed again. Had to do this since it would not fit 8 1/2x11 paper, then lined up tracing using the + marks and taped together. The carving will be 13" long.
Then I modified the drawing for the pose I liked, then cut the pattern out. This paper pattern was then placed on a block of tupelo and cut out with a bandsaw. This paper pattern will be used later also to ensure the carving size is correct.
|
 |
|
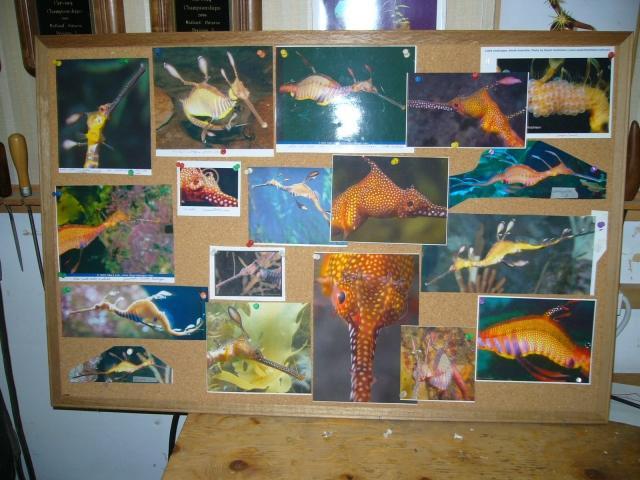
This step can be most time consuming.
Now I go back to Google and find images of the Weedy that will help me carve the fish as accurate as possible, then tack them to a cork board. If I'm working on the head of the carving, I will find the photos which best show the Weedy's details and place the photos close to where I am carving so I can refer to them often.
|
 |
|
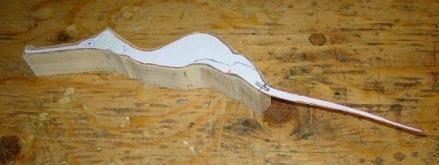
With a suitable thick piece of tupelo, the paper pattern is drawn on the wood, then bandsawed out. I decided to remove the 1/2" bandsaw blade and install a 1/4" blade.
Boxwood was used for the seadragon's tail. A small 1/8" maple dowel was used to help support the attachment. The boxwood I used for the tail was difficult to shape, as boxwood is very dense and hard. Looking back now, I should have used perhaps walnut, birch or maple.
|
 |
|
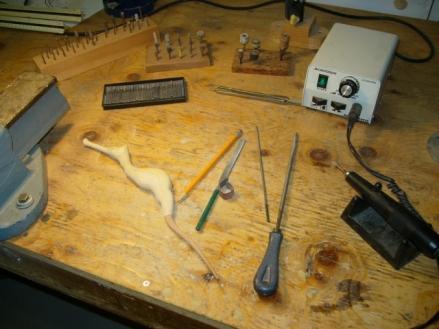
Good photo of my small work area.
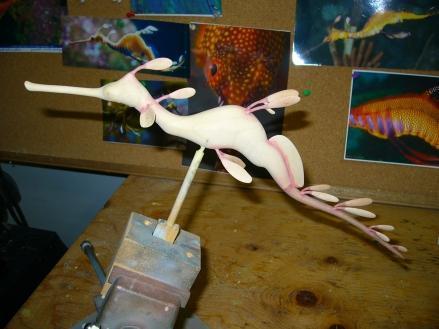
Some progress, with boxwood tail attached and seadragon rough shaped. The difficult part is trying to determine the thickness of the body at various points. I just keep checking my reference photos while removing more wood till it looks good. A round chainsaw file worked well for shaping the boxwood tail. A coarse grit Kutzall Rotor Saw worked the best for rough shaping of the boxwood. As far as amount of fine detail, I spent considerable time working on the head. The eyes were carved in, instead of using glass eyes. Not knowing the width of the real fish made the project more difficult, so it was wise to go slow removing wood. |
 |
|
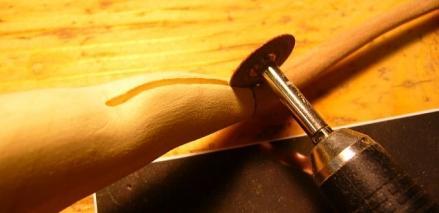
I used a diamond wheel to cut a slot for the dorsal fin in the weedy. Then a small diamond bur to make the slot slightly wider.
|
 |
|
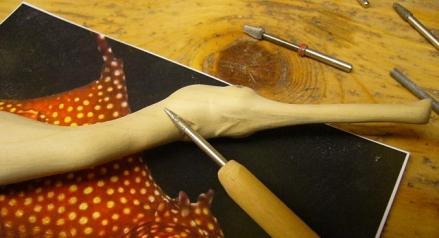
Here's a tip. Use a wood dowell and drill a hole in the end to accomodate your burrs. In the photo I am using a diamond burr to aid in sanding, but you can use stone burrs, etc. With the various diamond profiles available, small details are easier to make.This photo shows how I have tried to keep the head even on both sides of the centerline. In the carving process, check from the front, top, and bottom. If you see that it is not quite right, slowly and carefully remove wood. As you get closer to the desired shape of your carving, go from coarse, medium, and fine carving burs, files, and stones. It is important to go slow. It may take considerably longer, but there is far less chance of making a mistake.
|
 |
|
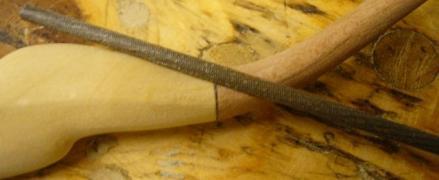
This can be challenging, to "blend" this joint. The boxwood is extremely hard, especially compared to the tupelo. The file wants to remove more tupelo than boxwood. Here I'm using a small diameter chainsaw file (1/8"?) on an angle to the joint. A small flat file works well in blending the two woods together. I will probably end up cutting the joint out slightly and then use filler.
|
 |
|
The leaf-shaped appendages have been added. I made them out of poplar since they require to be stronger than the tupelo. Also the dorsal fin and two pectoral fins have been fitted, and tail joint completed. Each appendage was carved, allowing enough wood so I could drill a small hole to insert a heavy wire. It was glued, then the wood was shaped to the wire. Then I applied Bondo Glazing and Spot Putty and blended again. Then more putty along the wire, several coats reguired to build it up, leaving some metal showing which would be glued into the Weedy body. Then final shaping with filler. I used acetone to help thin the putty so it would flow better. Each appendage was held by hand and shaped, then they were glued to the body. I decided not to attach them to the body then use the filler and blend the metal to the appendages because it would be awkward and chance of breakage. |
 |
|
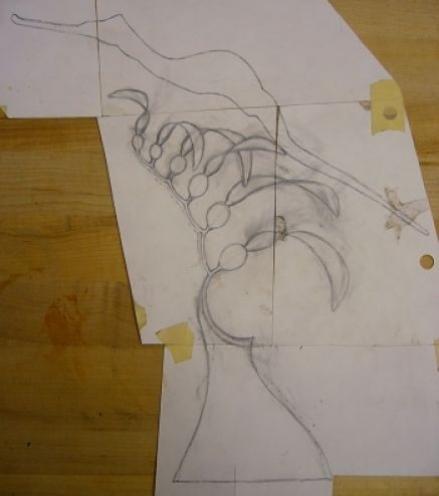
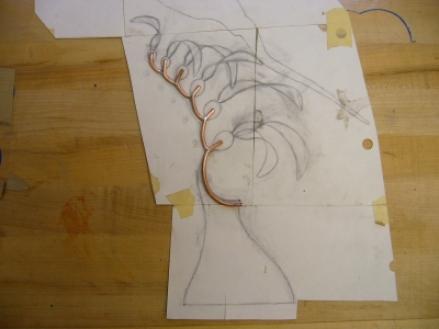
Here is the final sketch which shows the Weedy Seadragon, Giant Kelp, and the base. Several sketches were made to get the design and composition that I liked best. Normally I do not make any sketches of complex sculptures, however for the Weedy Seadragon, I did a sketch well into the project, primarily to determine the composition of the kelp and design of the supporting base. I never draw side views of a composition, but leave it to the final bending of the stem and leaves for best design. Just too difficult and time consuming to draw. For the base I wanted to get away from my usual design for a more contemporary look. The resulting design I decided upon was unique and complimented the carving. Tasmanian Myrtle Burl, a wood found in Southeast Australia, and New Zealand was used for the base. An example of Tasmanian Myrtle Burl  |
 |
|
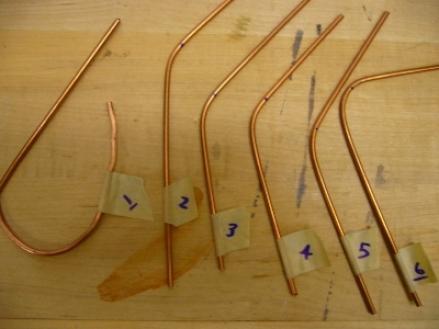
In making the stem for the kelp, here are some 1/8" copper rod pieces bent to proper shape according to my drawing.The blue ink on the copper pieces indicates where I held the rods in my vise, so they could be bent at the correct angles. Also the marks indicate where the rods will be soldered.
|
 |
|
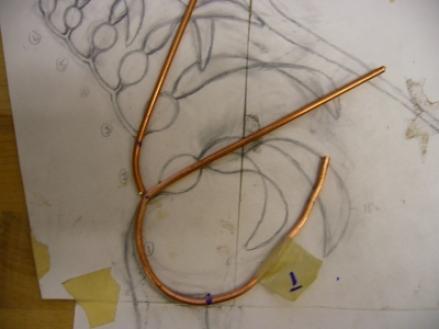
Here the first piece has been cut to length and placed on the pattern to check and then determine where and how much bend is required to line up with the kelp. Once bent, the copper rod is chamfered to accomodate extra solder to make the joint stronger.
|
 |
|
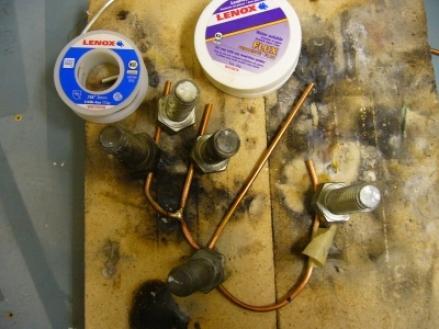
The copper piece has been placed on fire brick, correct alignment and soldered. Large bolts are used to hold the copper pieces in place while soldering. One bolt is placed on the previous soldered joint to act as a heat sink, thus absorbing some of the heat and hopefully protecting the previous joint from melting.
|
 |
|
Look closely and you will see the copper end that will be soldered is pointed somewhat (chamfered). The soldered joints have been filed with a chainsaw file. The distance at the copper ends is measured according with the layout on the pattern to ensure the copper rod is at the correct angle before soldering.
|
 |
|
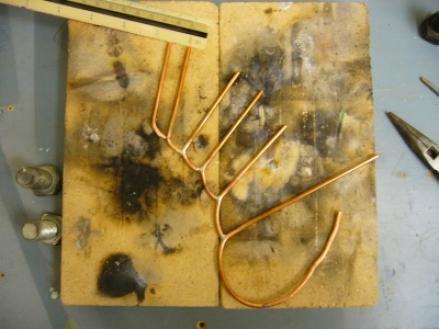
Soldering is complete and the waste copper has been sawed off. Final check with the pattern. It's very important to have extra copper rod on each piece so the bolts can hold the copper down while soldering. Also you have something to hold on to during final filing of each joint. Most filing was performed with the copper held in a vise. I'm quite pleased with the final result, and the next step is to solder two short pieces at the bottom which will fasten to the base.
|
 |
STUDIO PAGES |