|
Home
| Gallery
| About
| Awards
| History of Trophy Fish Carving
| Yesteryear
| Worldwide
| World Championships | Blog | Contact |
|
Home
| Gallery
| About
| Awards
| History of Trophy Fish Carving
| Yesteryear
| Worldwide
| World Championships | Blog | Contact |
|
Here is a photo of how I made the Giant Kelp gas filled floats from wood dowels. I selected dowels that were slightly larger in diameter than I needed, exception the third from the right,(I was too lazy to go to the store to get the dowel I needed). Also the two right ones were left over from a previous project, however the second from the right had to be reduced in size. If I had a small lathe, it would have been much easier to make the floats.
|
|
|
In this photo, it shows the floats have been added and the two 1/8" copper rods have been soldered to the stem.
|
|
|
Dry fitting all the parts. You may notice that one leaf was not added at the bottom, as I felt there would be too many and too crowded. Also the leaf that will be used to support the Weedy is near the desired attachment point. Once that location is made and leaf temporarly attached, then the remaining leaves can be positioned and bent if necessary. Five minute epoxy used to glue the some of the floats to the leaves. This makes things easier while trying to position everything together as it was frustrating with floats and leaves always coming apart while finding the ideal location of the leaves. |
|
|
Starting to use small wood blocks to try and keep the leaves in position. Also tape to hold the stem. Notice the leaf to hold the fish is pretty well where I want it. A copper pin is still to be attached to the leaf and a hole drilled into the fish to accomodate the pin. I purchased the copper at a store that specializes in all kinds and shapes of metal, called Metal Supermarkets. As far as the thickness, my digital calipers measure it at 0.56mm, or 0.022 inches which is about halfway between 1/32" and 1/64". I notice on the store's website they have three grades of copper sheet, but I don't know what I have. It's fairly stiff and when heated with a torch it becomes less stiff. I practiced this with the mini torch then dropped it in some water and I believe some of the stiffness came back. When soldering the 1/8" copper stem, it was also effected by the heat. Since the Weedy Seadragon carving is extremely light, the copper leaf will have no trouble holding it securely in place. |
|
|
Here I am using a number of small wood blocks to hold things in place. The kelp and Weedy Seadragon are to be on the same centre-line (or plane) so I have placed blocks to align them. Also using 1/8" copper rod to determine angle to drill hole into Seadragon. The dogwood was very hard to drill and I resorted to using a cobalt drill bit to get the hole started. It was difficult not only because of the wood hardness, but I had to drill the hole while holding the carving in my hand.
|
|
|
The copper rod has been soldered onto the leaf and cut to length.
|
|
|
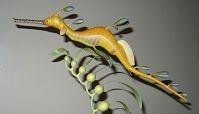
Now it's test fitted into the tail of the Weedy. The aim here will be to have the parts fit together tight so the copper pin will not show.
|
|
|
This photo shows the three main parts held in position using a twist tie, masking tape and copper wire. Also the prototype base which will require further shaping to make it look more pleasing.
|
|
|
|
|
|
Screws were used to fasten the Cocobolo since it is a very oily wood and somewhat difficult to glue. Easier to fasten with screws. Also square brass tubing inserted in drilled hole and glued, to accomodate square steel rod. The rod will be used in a carrying case and one will be used with the dust cover for display. It ensures the carving will not move. For the carrying case, two screws are also used to fasten the carving. Even if the case was upside down, the carving is secure.
|
|
|
The finish on the base is complete. It started with two coats of shellac (to seal the oily Cocobolo), two coats of lacquer, followed by Minwax paste wax and 0000 steel wool for a glass finish. First time I used the wax and steel wool and was amazed at the finish is created. I loaded the steel wool up with the wax before buffing the base.
|
|
|
This photo shows where I have carved out a hole in the base to accomodate a piece of lead. The lead provides a little extra stability to the carving.
|
|
STUDIO PAGES |